How to Use a Speed Square: Every Marking It Makes
The fence does nearly all the work, and three of the five jobs take ten minutes to learn. Here is every marking on a speed square, what it does, and the two you can safely ignore.

- Category
- Measuring & Layout
- Tools tested
- 3
- Read time
- 14 min
- Updated
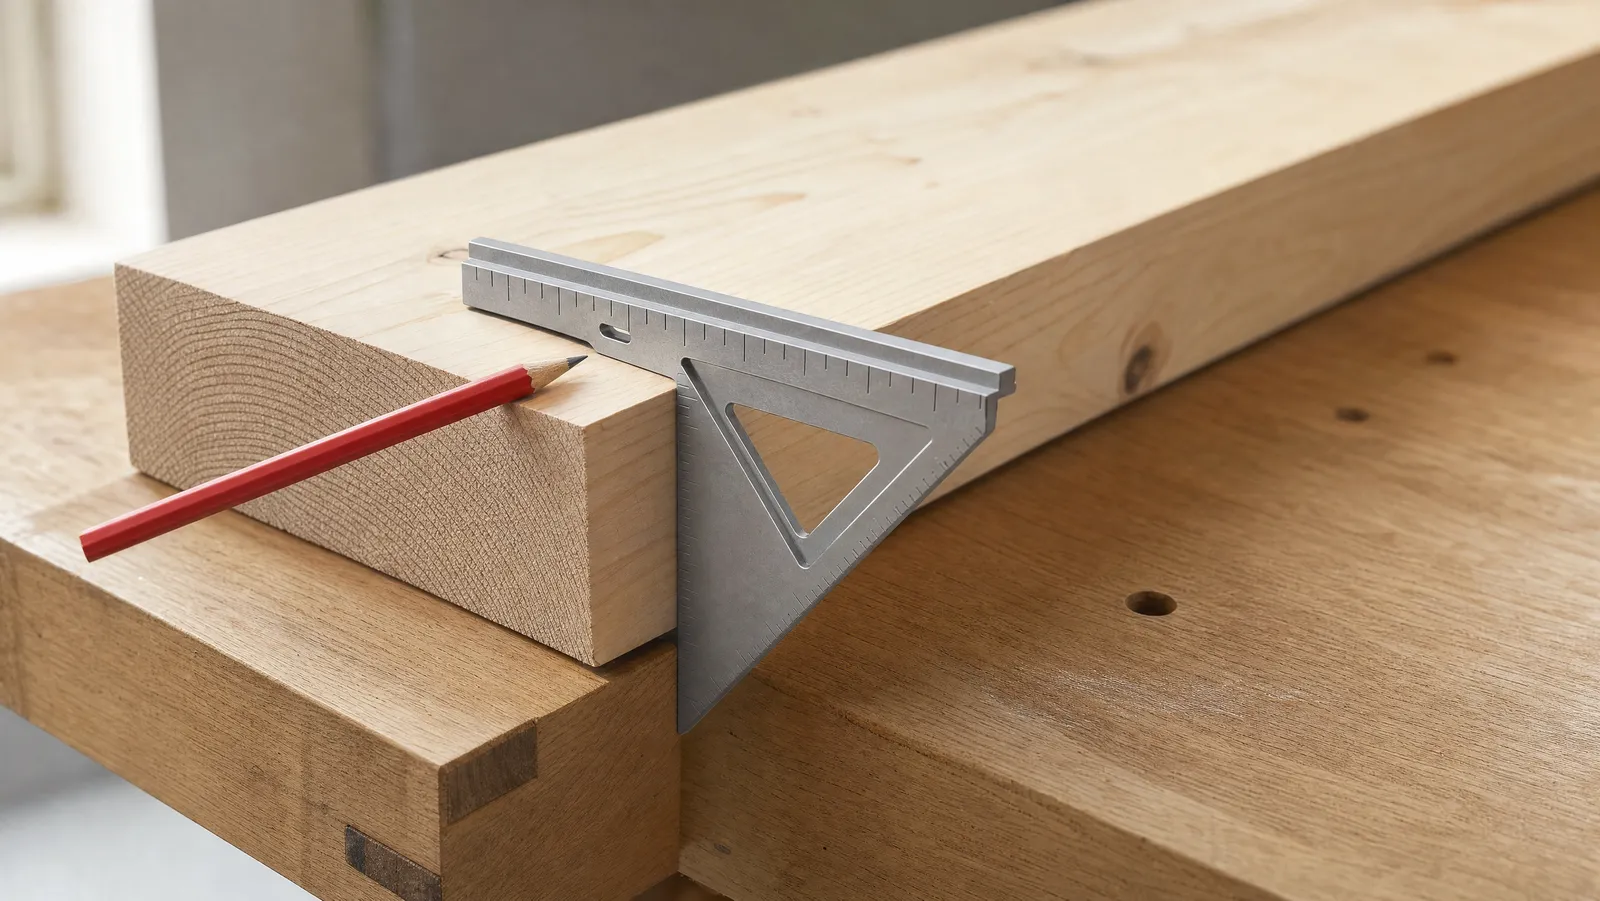
To learn how to use a speed square, start at the lipped edge — the fence — because it does nearly all the work. Hook that fence over the edge of a board and the square hands you a dead-square 90-degree line and a clean 45 with no measuring at all. The pivot corner covers every angle in between. Three of its five jobs take ten minutes to learn; two you will probably never need.
Below we go through every marking on the tool, in the order a beginner should learn them, and we are honest about which scales are dead weight for a homeowner. If you are still assembling the drawer, the speed square sits near the top of our list of measuring and layout tools every DIYer should own — ten dollars for a tool that replaces four or five others.
What a speed square is used for
A speed square is a fixed right triangle with a raised lip along one edge. Nothing on it moves — no sliding head to loosen, no wing nut to lose, no battery. That rigidity is the point: a tool that cannot go out of adjustment is one you can trust.
According to Swanson Tool Company's own history, the tool was invented in 1925 by Albert J. Swanson, a Swedish-American carpenter in Chicago, and combined five instruments into one triangle: a try square, a miter square, a saw guide, a line scriber and a protractor. Swanson says it patented the design that year and formed Swanson Tool Company in 1945. The "Made in the USA since 1925" line on the packaging is Swanson's claim about its own product, not an independent finding.
Five jobs, then: square lines, 45s, arbitrary angles, saw guiding and scribing. What it will not tell you is whether anything is level or plumb — a different tool, and we cover the options in the best levels for DIY.
Start with the fence, because this is what beginners get wrong
Turn the square over. One edge is thicker than the rest and stands proud of the plate. That is the fence, also called the lip or flange.
The fence is the tool. Every accurate mark a speed square makes depends on that fence being hooked over the edge of your board and held there under pressure. Beginners lay the square flat on the board like a protractor, line it up by eye, and wonder why their cuts wander.
The habit to build:
- Hook the fence over the edge of the board, not the end.
- Pull gently toward you so the fence contacts along its whole length.
- Hold it down with the heel of your palm, not your fingertips, so it cannot rock.
- Keep the pencil tight against the plate edge.
Do that and the square is repeatable. Skip it and it is decoration.
Marking a square cut
This is the ninety percent job. Hook the fence over the edge of the board and the ruled edge running perpendicular to the fence is already at a perfect 90 degrees to that edge. Draw along it. No measuring, nothing to set.
Two refinements worth having:
Wrap the line. Cutting by hand, mark the top face, then roll the board and mark the two adjacent faces from the same start point. A saw with a line on three faces has nowhere to wander.
Mark to the line, not near it. Draw a small V with its point on your measurement, then set the square against the point — a habit that belongs to the tape as much as the square, and one we cover in how to use a tape measure like a pro.
Marking 45 degrees
The long diagonal edge — the hypotenuse — sits at exactly 45 degrees to the fence, so the procedure is identical to a square line: hook the fence over the board edge, hold it down, and draw along the long edge instead of the short one.
One thing to be clear about: this marks a 45-degree miter across the face of the board — the cut you make for a picture frame or a trim corner. It is not a bevel. A bevel tips the blade over relative to the face, and a speed square cannot lay one out.
How to mark angles with a speed square using the pivot
Here is where most articles go vague, so read slowly. The square carries a degree scale running 0 to 90 along the hypotenuse, and its marks are deliberately unevenly spaced — crowded at one end, wide at the other. That is not a printing error; it is what the geometry requires.
The corner stamped PIVOT is the right-angle corner, at one end of the fence. It is the centre of rotation for every angle you mark.
- Hook the fence over the edge of the board as normal, with the pivot corner sitting on the edge.
- Press a thumb and finger on the pivot corner. According to Hunker, this is the right-angle corner of the square where it says PIVOT, and it must not move again.
- Swing the fence end of the square away from the board, rotating around that pinned corner. The board's edge sweeps across the degree scale on the hypotenuse.
- Stop when the edge of the board lines up with the degree number you want. Bob Vila describes this as aligning the tick mark for your angle with the edge of your board.
- Draw along the edge of the square that is opposite the angle readings and perpendicular to the lip — Bob Vila's phrasing, and it is the ruled short edge, the same one you used for your square cut.
The single most useful thing to understand: the number you read is degrees away from square, not degrees from the edge of the board. Hunker describes the reading as the degree of angle away from vertical. Set the square to 30 and you get a line 30 degrees off a square cut.
Keep the pivot pinned. If that corner creeps while you swing, the angle you read is not the angle you drew, and on a long board a small error there becomes a visible gap at the joint.
How to use a speed square as a circular saw guide
This is the trick that converts people: instead of marking a line and following it freehand, you use the square itself as a fence for the saw.
Set the board on supports with the cut line clear. Hook the fence over the far edge so the square's ruled edge sits on your line. Bring the saw up until the flat side of its shoe touches the square's edge, start it, and push forward with the shoe riding against the square the whole way. The result is a crosscut as clean as a mitre saw's, with no clamps.
A 7-inch square gives enough guide edge for a 2x4 or a 2x6. Anything wider and the shoe runs off the end before the cut finishes — the main argument for the 12-inch version below.
The scribing notches and the diamond
Look into the open middle of the square and you will see a row of small notches. Bob Vila describes them as notches a quarter inch apart, used for scribing: drop a pencil tip into the notch at the offset you want, hook the fence over the edge of the board, and drag square and pencil together down the stock. You get a line parallel to the edge — a rip line, a hinge gain, a shelf-pin reference — without a single measurement.
It is faster than pinching a tape and dragging it, and more accurate, because the fence does the referencing rather than your thumb.
The diamond cutout is more specialised. Swanson lists it as a 3-1/2 inch cutout on the standard 7-inch square — the width of a 2x4 top plate — and treats it as a trademark feature: "look for the Diamond cutout, that's how you know it's a true Speed Square." Swanson's stated use for it is marking a one-motion seat cut on common, hip and valley rafters. (The larger Pro square carries a 5-1/2 inch version sized for 2x6 stock.) In practice: rafter seat cuts and scribing stud width. If you are not framing a roof you will use the diamond about once a decade — but it has a job, rather than being a weight-saving hole.
The rafter scales, honestly
Two more rows of numbers run inside the long edge, marked COMMON and HIP/VAL. They are the reason the tool is sometimes sold as a "rafter square".
Swanson explains the system as the One Number method: the numbers correspond to roof pitch expressed as rise in inches for every 12 inches of horizontal run. The COMMON scale gives the layout for a common rafter at that pitch. The HIP/VAL scale gives the equivalent for hip and valley rafters, which cross the corner of a roof at 45 degrees, so their run works out at roughly 17 inches for every 12 inches a common rafter travels.
That is what the scales are for. Here is the honest part: most DIYers will never touch them. A wrong rafter is a structural problem, not a cosmetic one. If you do get to that point, the pocket Blue Book of rafter tables that ships with a Swanson square does the arithmetic and walks through the plumb, seat and cheek cuts step by step. Use the book — and be sceptical of anyone who tries to teach roof framing in one section of a how-to article.
Speed square markings explained: every mark in one table
Check that your square is square
A cast aluminium square dropped on a concrete floor can be out, and you will not see it by eye. Test it, because everything you build downstream inherits the error.
Katz-Moses Tools describes the flip test: on a board with a known straight edge, press the square's fence firmly against it and mark a line along the blade. Then flip the square so the fence points the other way, set the blade right next to the first line, and mark a second. According to Katz-Moses, the two lines should be perfectly parallel with an even gap along their whole length; if they diverge into a wedge, the square is not square.
Flipping doubles the error, which is why the test works: a deviation too small to see in one line shows up plainly as a taper between two. A sharp pencil is adequate; a marking knife is better, because the thinner line makes the gap easier to read. If your square fails, retire it to the rough-marking drawer. At ten dollars there is no argument for nursing an inaccurate square along.
7-inch or 12-inch? The speed squares we would buy
The disclaimer we put on every buying section: we do not hands-on test tools at The DIY Tool Review. These selections come from published manufacturer specifications, current price and availability, and nothing else. Prices are as of August 2026 and they move.

Swanson S0101
The original. Swanson lists gradations for common, hip, valley and jack rafters, 1/4-inch scribing notches, a diamond cutout, a non-glare matte finish and the pocket Blue Book of rafter tables. Made in the USA since 1925.
Pros
- Ten dollars for a tool that replaces five others
- Scribing notches at 1/4-inch spacing and a diamond cutout
- Blue Book removes the rafter maths
- Non-glare matte finish stays readable in bad light
Cons
- Seven inches is short for boards wider than a 2x8
- Cast aluminium chips if you drop it on concrete
- The rafter tables need reading before they help you
The S0101 has been the default answer for decades. Swanson lists gradations for common, hip, valley and jack rafters, the quarter-inch scribing notches, the diamond cutout, a non-glare matte finish and the pocket Blue Book. At $9.98 as of August 2026 it is the cheapest genuinely useful tool most people will buy. The catch is size: seven inches is short for anything wider than a 2x8, so it will not guide a saw across a 2x10 in one pass.

Swanson SW1201K Value Pack
Both Swanson sizes in one box - the 7-inch for pockets and the 12-inch Big 12 for wide stock - in heavy-gauge billet aluminium, with the Blue Book. Swanson says the die-cast design is more reliably accurate than laser-etched or stamped squares.
Pros
- Both useful sizes for six dollars more than the 7-inch alone
- Heavy-gauge billet aluminium construction
- The Big 12 crosses a 2x12 in one pass
- Blue Book included
Cons
- The Big 12 in this pack ships without the layout bar
- Twelve inches is too big for a tool belt
- The accuracy-versus-stamped-squares claim is Swanson’s own
For six dollars more the SW1201K pack adds the Big 12 alongside the 7-inch — pocket square for layout, Big 12 for guiding the saw across wide stock. It is $16.50 as of August 2026. Two catches: the Big 12 in this pack ships without the layout bar, and Swanson's line that its die-cast construction is more reliably accurate than laser-etched or stamped squares is the manufacturer's own claim, not an independent finding.

Mr. Pen 12-Inch
A 12-inch aluminium rafter square with etched measurements and conversion tables, aimed at wide boards and angle layout where a 7-inch square runs out of edge.
Pros
- Twelve inches of edge for under fifteen dollars
- Etched markings rather than printed ones
- Lightweight aluminium that will not rust
Cons
- No Blue Book of rafter tables
- Mr. Pen publishes no squareness tolerance
- A generic square with no track record behind it
The Mr. Pen 12-inch is the budget route to a long square at $14.99 as of August 2026, with etched rather than printed markings. But Mr. Pen publishes no squareness tolerance at all, and there is no Blue Book in the box. Squareness is the one specification that matters on this tool, so we would rather pay the extra dollar-fifty for the Swanson pack.
Our straight recommendation: if you own no square, buy the Swanson S0101 7-inch and get on with it. If you know you will be crosscutting 2x10s and sheet goods, spend the extra six dollars on the Swanson value pack and keep both sizes on the bench.
The bottom line
The fence does the work. Hook it over the edge and 90 degrees and 45 degrees are free. Pin the pivot corner, swing until the board's edge meets your number on the degree scale, and draw along the perpendicular ruled edge — that covers every angle between, and the number you read is the number you set on your saw. Drop a pencil in the quarter-inch notches to scribe a parallel line. Ignore COMMON and HIP/VAL until the day you frame a roof. Then flip-test the square once a year, or the moment you drop it.
Elsewhere in this series we put a laser measure up against a tape measure. A speed square is one of the first things we hand to anyone building out essential DIY tools, and it sits alongside the tape, the level and the stud finder in our complete measuring and layout tools guide.
About the Author
Cheryl Thompson
Cheryl Thompson is the tools editor at The DIY Tool Review. A lifelong fixer and self-confessed tool addict, she has spent years buying, borrowing and wearing out hand and power tools across home renovation, furniture building and everyday repairs. She writes hands-on, no-nonsense reviews to help fellow DIYers spend their money on the tools that actually last.