Cordless Tool Storage Ideas: Charging Station Setups for Your Garage
The problem with your cordless collection isn't clutter — it's charge state. Five garage storage and charging station setups, cheapest first, starting with a scrap-plywood shelf that costs nothing.

- Category
- Power Tools
- Tools tested
- 3
- Read time
- 13 min
- Updated
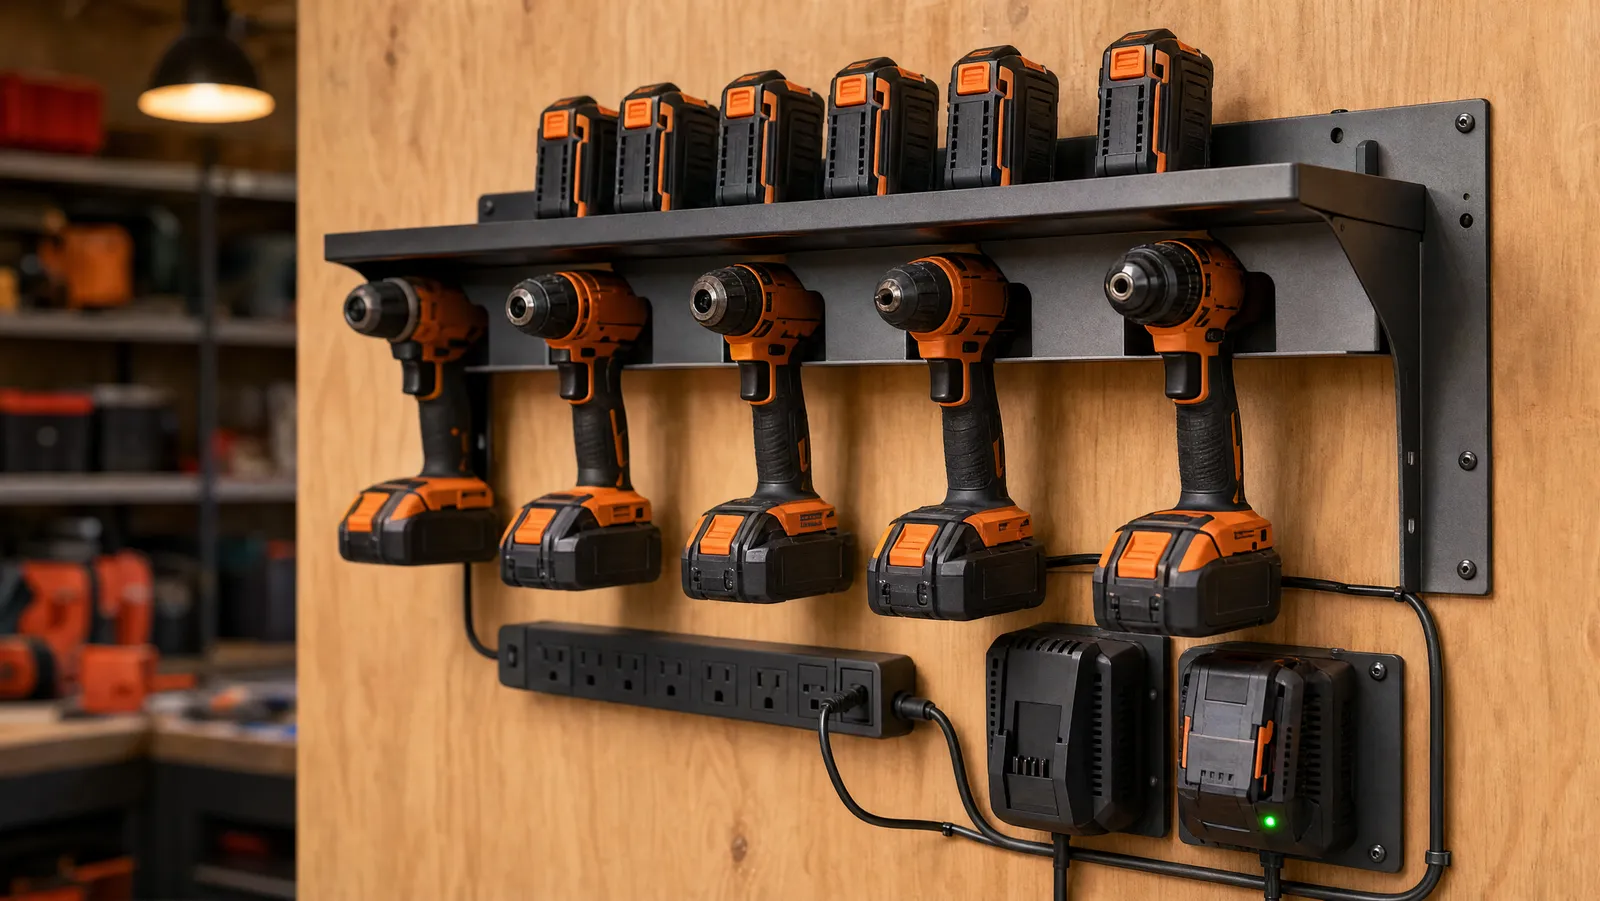
The best cordless tool storage ideas all fix the same problem, and it is not clutter. It is that you own four batteries and not one of them is charged. The answer is a single wall: chargers, packs and tools together, near an outlet, with a designated spot for full packs.
Below are five setups, cheapest first — a scrap-plywood shelf costs nothing, a French cleat wall costs a weekend. If you are still building the collection, start with our guide to cordless power tools for DIY or the best cordless power tool combo kits for beginners.
The rule that actually fixes this
Any rack tidies a garage. Almost none of them tell you which battery is charged, and that is what wastes your Saturday: you walk to the shelf, grab a pack, clip it on, and the light blinks red. So before you cut any plywood, adopt the rule. It costs nothing and works even if you never build a thing.
The corollary: one charger has to stay plugged in and reachable. A charger buried in a drawer never gets used, which is why every setup below puts power on the wall.
Where to put your power tool charging station
Pick the wall first — it constrains everything else.
Near an outlet. A charging shelf that needs a 20-foot cord snaked across the floor is one you will unplug. If the only outlet is at the far end of the garage, that end is your wall.
Out of the extremes. Garages bake in August and freeze in January, and both ends of that swing are hard on lithium-ion packs. Skip the wall that catches afternoon sun and the uninsulated exterior corner.
At a height you can reach. A circular saw lifted down from above shoulder height is an accident waiting to happen. Heavy things between waist and chest; light things up top.
Then check the wall itself, because it decides your fasteners.
Five DIY cordless tool storage setups, cheapest first
A scrap-plywood drill shelf
The cheapest real answer, and often the best. Take a length of 3/4 in. plywood 5 to 6 in. deep, lay your drills on it nose-down, and mark where the handles fall. Cut a slot for each handle so the tool hangs by its body with the battery below. Screw it to two studs — 32 in. of shelf spans two at typical 16 in. spacing — and add a ply cleat underneath for rigidity.
Cost: whatever the offcut is worth. Build time: under an hour. It holds four to six drills and drivers — most people's whole kit.
A pegboard wall
Pegboard is the flexible option: cheap by the sheet, endlessly rearrangeable, ideal for the bit sets and hand tools that clutter a shelf. It is also the one people install wrong.
Pegboard needs a gap behind it. According to Hunker, the trick is to create "a 1/2-inch or larger gap between the wall and the back of the pegboard" so the hooks have somewhere to go, and the traditional method is fastening 1x2 furring strips to the studs, one piece per stud — which on traditionally framed 16-inch on-center walls means a strip about every 16 inches — then screwing the board to those. Mount the board flat to drywall and the hooks will not seat.
Use pegboard for accessories and a screwed-down shelf for anything heavy — a six-pound tool does not belong on a hook.
A French cleat wall
Where people who enjoy building things end up. A French cleat is a board ripped down its length at 45 degrees: one half screws to the wall bevel-up, the other glues to the back of each holder bevel-down, and gravity wedges them together. Every holder then lifts off and moves anywhere along the rail without unscrewing anything.
Run rails horizontally every 8 to 10 in. from waist height up and build holders as you go — a drill cradle, a charger tray, a battery bin. Budget a weekend and a sheet of plywood.
A dedicated charging shelf with a power strip
The charge-state rule made physical, and the highest-value thing you can build.
Screw a shelf to the studs at about chest height. Screw the chargers themselves down to it — most have keyhole slots; if not, a plywood strip with a cutout will trap them. Mount one power strip under the shelf and plug every charger into that, so the whole station is one cord to one wall outlet. Leave 8 to 10 in. of clear shelf to the left of the chargers. That is where charged packs go.
Run two brands and you need two chargers up there — a decent argument for consolidating, so read our take on picking a cordless power tool brand first.
Bins, cases and the systainer approach
If your tools leave the garage, wall storage is the wrong shape. Stackable interlocking cases — Festool Systainers, DeWalt ToughSystem, Milwaukee Packout, Ryobi Link — carry a whole kit in one trip and stack on a shelf at home. They cost real money and eat space.
Most people land in the middle: cheap bins for consumables and spare packs, one case for the tools that travel, the wall for everything else. If your kit is mostly the must-have cordless power tools, one case and one shelf covers it.
Pick your setup
Most garages end up as a combination, which is how garage tool storage generally works: a charging shelf for the packs, pegboard beside it, a case for what goes in the truck. Do the charging shelf first.
Charging safety and battery life
Where the chargers go is a safety decision, not just an organisational one. Heat is the main enemy. According to Battery University, the recommended storage temperature for most batteries is around 15°C (59°F), and lithium-ion "has higher losses if stored fully charged rather than at a SoC of 40 percent." Its one-year storage figures put both effects together: a cell held at 40°C keeps roughly 85% of its capacity at 40% charge, but only about 65% at full charge. A full pack sitting on a charger in a hot garage is the worst of both.
Cold matters mostly for charging. The U.S. Fire Administration advises: "Do not charge them at temperatures below 32 degrees F (0 degrees C) or above 105 degrees F (40 degrees C)." A pack that spent January in the garage should warm to room temperature first. For the specs underneath all this, our cordless power tool batteries explained guide covers voltage, amp-hours and platforms in plain English.
How hard a tool works its pack matters too — an underrated argument for brushless versus brushed motors: a brushless tool draws less current for the same job, so packs run cooler and hit the charger less often.
If you'd rather buy than build
If a weekend of woodworking is not the plan, there is a category of ready-made cordless power tool storage racks: a metal wall shelf with drill holders and a power strip bolted in. Be clear-eyed about what they are: unbranded imports sold under several near-identical names, and every figure below — load capacity, surge joules, dimensions — comes from the seller's own listing. We have not built, bought or tested any of them; our picks rest on published specs, price and availability.
What they get right is the integrated strip: the whole rack becomes one plug. Prices are as of August 2026.
The all-in-one: POKIPO 4-tier rack
The most sensibly proportioned of the three. POKIPO lists a 4-tier layout with eight drill slots, two side bit racks, four hooks and two shelves, plus an 8-outlet strip on a 6.5-foot cord — enough outlets for every charger you own. The maker quotes a 330 lb load capacity and a 16.5 in. long frame, and that length is the catch: four drills, an impact driver and two chargers will fit, a ten-tool kit will not. Mounting hardware is included, with fixings listed for wood, concrete and pegboard.

POKIPO 4-Tier Rack
A four-tier wall rack with an 8-outlet power strip built into it, so the chargers live where the tools do and the whole shelf runs off one plug. POKIPO lists a 330 lb load capacity and a 16.5 x 8.7 x 12 in. frame.
Pros
- Integrated 8-outlet strip on a 6.5-foot cord puts charging on the same shelf as the tools
- POKIPO lists eight drill slots, two side bit racks, four hooks and two shelves in one 4-tier unit
- Mounting hardware included, with fixings listed for wood, concrete or pegboard walls
Cons
- Compact — POKIPO lists it at 16.5 in. long, so a large collection outgrows it quickly
- At $49.99 it costs noticeably more than the larger budget rack below
The budget option: CCCEI utility shelf
At $28.39, down from a $29.99 list price, this is the cheapest route to a shelf-plus-strip on the wall. CCCEI lists an all-metal build with double shelves, four drill holders and 16 storage holes sized for different tools, on a 30.9 in. long frame — longer and deeper than the POKIPO above, though CCCEI lists it as lower, at 9.37 in. high against POKIPO's 12 in. The 8-outlet strip is listed with 1200J surge protection and 125V / 15A / 1875W output. No load capacity appears in the listing, worth knowing before you hang your heaviest tools on it.

CCCEI Utility Shelf
The cheapest way to get a metal shelf and a power strip onto the wall as one piece. CCCEI lists an all-metal build, an 8-outlet strip with 1200J of surge protection, and a 30.9 x 16.9 x 9.37 in. rack the maker says goes together in 10 to 15 minutes.
Pros
- Least expensive of the three at $28.39, down from a $29.99 list price
- CCCEI lists four drill holders plus 16 storage holes sized for different tools across double shelves
- Offered in black, red or yellow, with all hardware listed as included
Cons
- The listing quotes no load capacity, so how much weight it will take is anyone's guess
- Fewer shelves and slots than the larger rack below if your kit is already big
For a bigger collection: POKIPO large 4-layer
Buy this if the collection has already won. POKIPO lists six shelves, eight drill slots, two side bit racks and a hook rack in what it calls industrial-grade metal, with load capacity quoted at up to 600 lbs — the highest figure here and, again, the seller's own. The compromise is at the outlet: four sockets rather than eight, on the same 6.5-foot cord. Run three chargers plus a shop light and you are out of plugs. At $65.99 it is the priciest here and the only one sized for a genuinely large kit.

POKIPO Large 4-Layer
The version for a garage that has got out of hand. POKIPO lists six shelves, eight drill slots, two side bit racks and a hook rack in industrial-grade metal, with a load capacity the maker puts at up to 600 lbs.
Pros
- Most storage of the three — POKIPO lists six shelves and eight drill slots
- POKIPO lists a 600 lb load capacity, the highest figure quoted across these racks
- Mounts to wood, concrete or pegboard with the hardware and manual included
Cons
- Only a 4-outlet strip, half the outlets of the two cheaper racks here
- Most expensive of the three at $65.99
A word on outlets
A charging station concentrates several chargers, and maybe a shop vac, onto one circuit. Two rules keep it sane.
First, do not daisy-chain power strips. According to OSHA's guidance on relocatable power taps, UL-listed power strips must be connected directly to a permanently installed branch-circuit receptacle and are not to be series-connected to other taps or plugged into extension cords; OSHA ties this to 29 CFR 1910.303(b)(2), which requires listed equipment to be used according to the instructions in its listing. One strip, one wall outlet.
Second, if the shelf trips the breaker or the outlet feels warm, stop adding to it — that is a job for an electrician, not a bigger strip.
Frequently asked questions
Can you leave batteries on the charger?
For a night or two, it is not a crisis. For months, take them off. The issue is less overcharging than what state you store the pack in: a battery parked on a charger is a battery stored at 100%, and Battery University reports that lithium-ion "has higher losses if stored fully charged rather than at a SoC of 40 percent." DEWALT's own advice is to "store and charge batteries in a cool, dry location." Guidance genuinely differs here — DEWALT's charger manuals describe a maintenance mode that is designed to hold a connected pack at full charge until you need it, while consumer fire-safety advice runs the other way: the Raleigh, NC fire department, for example, tells people to "unplug devices when they're fully charged." The safest reading of both: if a pack is going unused for weeks, take it off, at partial charge, somewhere cool.
How should I store batteries over winter?
Indoors, at partial charge. Two things drive that. First, the U.S. Fire Administration advises not to charge lithium-ion batteries "at temperatures below 32 degrees F (0 degrees C) or above 105 degrees F (40 degrees C)" — an unheated garage in January sits below that floor, so a pack stored there cannot safely be charged until it warms up. Second, Battery University puts the recommended storage temperature for most batteries at about 15°C (59°F) and reports lower losses at around 40% state of charge than at full, while noting that "finding the exact 40–50 percent SoC level to store Li-ion is not that important." So: run a pack down to roughly half, shelve it indoors, and keep it away from anything flammable, as the USFA advises.
Do batteries go bad if you don't use them?
Yes, slowly, and heat speeds it up. Battery University's one-year storage figures show measurable capacity loss on lithium-ion cells that simply sat, worse at higher temperature and worse at full charge. Hence a rotation habit: use your oldest pack first, not the newest.
How high should a tool shelf be?
Our rule of thumb, not a code requirement: heaviest tools between waist and chest so nothing weighty is an overhead lift, the charging shelf at chest height where you can read the indicator lights, and the top shelf for light, rarely used things.
Where to start this weekend
Start with the rule, not the rack: charged packs on the left, flat packs onto a charger immediately. Then build the charging shelf, because it is what makes the rule stick — one shelf, chargers screwed down, one strip, one cord to the wall. Everything else is refinement. When the shelf gives you an excuse to fill the gaps, our cordless power tools guide is where to start.
About the Author
Cheryl Thompson
Cheryl Thompson is the tools editor at The DIY Tool Review. A lifelong fixer and self-confessed tool addict, she has spent years buying, borrowing and wearing out hand and power tools across home renovation, furniture building and everyday repairs. She writes hands-on, no-nonsense reviews to help fellow DIYers spend their money on the tools that actually last.